Oracle Golden Gate Data Replication from Oracle 11g Database to MSSQL
Server 2014
Introduction
In this
Document, I am performing data replication from Oracle Server to MSSQL Server,
We will be discussion Pre requisites and step by step configuration of required
tools and softwares.
We are going
to do replication from Oracle 11g R2 to Sql Server 2014 using Oracle Golden
Gate
Software
Version Used:
Oracle
Database Version : 11.2.0.1.0 (Applicable on Higher Version Also)
SQL Server
2014 or higher
Oracle
Golden Gate Version (OGG) : 12.3.0.1.5
for Oracle Database
Oracle
Golden Gate Version (OGG) : 12.3.0.1.6
for SQL Server
This whole
process will briefly take 5 Steps
Install OGG
on Windows Server i.e Target DB
Install OGG
on Oracle Database Server i.e Source DB
Set up
Extract and Pump Process which are required to pump the data
Set up
replicat process at the target database to update the change from the source.
Installing OGG into Microsoft Windows Server 2014:
<<< On the TARGET SERVER >>>
Download and extract the content of OGG from Oracle Website, copy the contents of the extracted ZIP into the new directory.
Open an Administrator level, elevated command prompt, and change directory to the GoldenGate directory you created.
Run GGSCI and create the OGG subdirectories:
C:/Users/oggdba> cd C:/GoldenGate
C:/GoldenGate> ggsci
GGSCI> CREATE SUBDIRS
Parameter
file C:\gg\dirprm: Directory Created
Report
file C:\gg\dirrpt:
Directory Created
Checkpoint
file C:\gg\dirchk: Directory
Created
Process
status files C:\gg\dirpcs: Directory Created
SQL
script files C:\gg\dirsql: Directory Created
Database
definitions files C:\gg\dirdef: Directory Created
Extract
data files C:\gg\dirdat: Directory Created
Temporary
files C:\gg\dirtmp: Directory Created
Credential
store files C:\gg\dircrd: Directory Created
Masterkey
wallet files C:\gg\dirwlt: Directory Created
Dump
files C:\gg\dirdmp: Directory Created
Give the MGR process a custom name:
GGSCI> EDIT PARAM ./GLOBALS
MGRSERVNAME <name-here> MGR
GGSCI> EDIT PARAM MGR
PORT 7819
GGSCI> EXIT
Install the OGG Manager as a service, with some options:
C:/GoldenGate> install ADDEVENTS
C:/GoldenGate> install ADDSERVICE
C:/GoldenGate> install AUTOSTART
C:/GoldenGate> install ADDEVENTS
Restart your windows system and verify the OGG MGR starts on boot, verify this with:
GGSCI> INFO MGR
Create MSSQL
Target Database, Schema, User and DSN:
This section will outline the basics of setting up the OGG Target DB and DSN, although this should be taken with some interpretation, use your own settings, permissions, naming schemes etc. as appropriate.
<<< On the TARGET SERVER >>>
Open SQL Server Management Studio, and create a new database to be used for storing your OGG replicated data set:
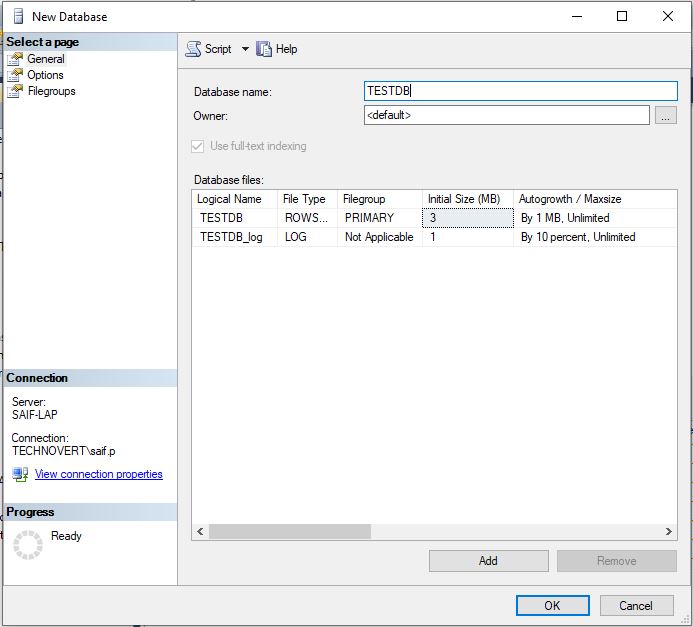
Create
the new DB.
Name it something you can remember.
Name it something you can remember.
You MUST change the Collation (default character set) to “Latin1_General_BIN2”. Without this set, You may run into issues trying to replicate certain Unicode characters in fields in the source DB.
Create SCHEMA within new DB:
Right click on your new DB, and select “New Query”, type:
CREATE SCHEMA “SCHEMA1”;
NOTE: “SCHEMA1” must be the name of your source SCHEMA that you are replicating.
Create the new User, and give SCHEMA ownership to user:
Right click “Security” in the SQL Instance branch (not within the Database), and select New Login.
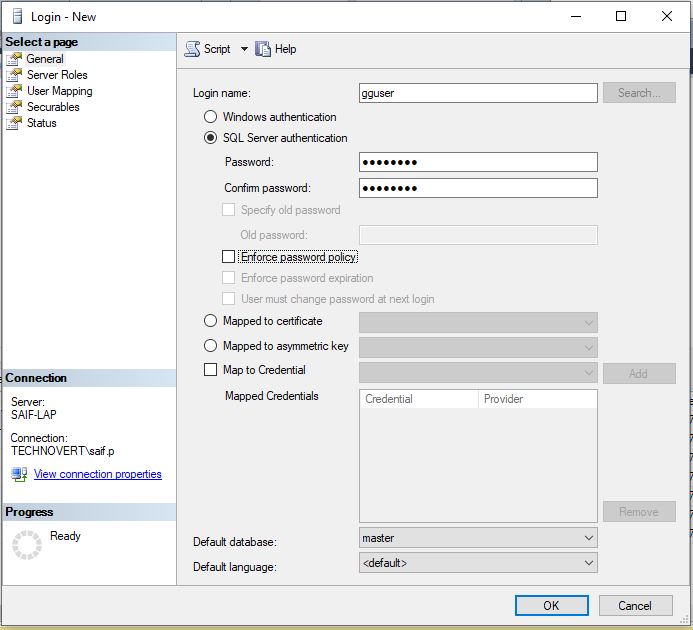
Ensure SQL Server Authentication is used, and set a secure password. Select your recently created DB as the users default DB, and choose “British English” as the users default language.

Within “User Mapping”, check the DB you just created, and ensure “db_owner” is selected. Take this opportunity to set the default SCHEMA to the SCHEMA you created earlier.

Create System DSN for use by OGG:
Open Control Panel, Administrative Tools, and open “ODBC Data Sources (64bit)”. Change tab to “System DSN” and click the ADD button.
Select “ODBC Driver 11 for SQL Server”, name your DSN something logical and simple, in this example “OGGDBDNS”, select the local SQL Server instance from the drop down. Make sure you select SQL Server Authentication. Check the box to connect to SQL to obtain additional settings, use the user you created earlier.
On the next screen, change the default DB to the DB created earlier. Leave everything else untouched. And finish the DSN Wizard.
Installation
of GG on Oracle Database
I am using
OGG Version 12.3.0.1.5 which you can download from Oracle Website. You can use
other version too but you need to check the compatibility of OGG with
respective version of database you are going to use.
Download the
file and unzip the file , You will see the below screenshot file in the folder

Click on the
setup file and to initiate the installation process.
Follow the below screen shot for installation.
1.


Installation
in almost complete now you need to do some post installation tasks to complete
the installation process.
Open CMD and
navigate to the GG source Directory
Once In the
source Directory
Fire the
commands “ggsci” to go into the Golden Gate command line Interface
Fire command
GGSCI> CREATE SUBDIRS
This command
will create the required sub directories, which will store all the required
metadata i.e parameter files for the extract, replicat and manager processes.
Follow the
below steps to set up the required processes manager, extact on source server ,
Verify
the manager is running OK:
[oracle@shell]# cd
/u01/app/oracle/product/ogg_src
[oracle@shell]# ggsci
GGSCI>
EDIT PARAM MGR
Port 7809
[Here you may add any additional manager options you want, by default, you only need the PORT parameter]
GGSCI>
INFO MGR
Will
show you if the mgr process is running or stopped.
Create
Schema TRANDATA
GGSCI>
DBLOGIN USERID <schema-user-here>
Password:
<user-pass-here>
GGSCI>
ADD TRANDATA SCHEMA1.*
Substitute
“SCHEMA1” for your schema you wish to replicate.
NOTE: Use of “ADD TRANDATA” only adds TRANDATA for the tables specified by your selection after it. If you add new tables after this is generated, new tables will have no TRANDATA, and therefore will not be able to be replicated until TRANDATA has been added. This is fine for me and this example, however a more robust solution would be to use ADD SCHEMATRANDATA, which adds at schema level, rather than table level, and new tables within the schema, are automatically included in the TRANDATA.
Verify that the TRANDATA is added OK:
GGSCI>
INFO TRANDATA SCHEMA1.*sssss
Create source table definition parameters:
Create source table definition parameters:
GGSCI>
EDIT PARAM DEFGEN
DEFSFILE
/u01/app/oracle/product/ogg_src/dirdef/<filename-here>.def, PURGE
USERID
<oracle-user> PASSWORD <oracle-user-password>
TABLEEXCLUDE
SCHEMA1.TABLEA;
TABLEEXCLUDE
SCHEMA1.TABLEB;
TABLE
SCHEMA1.*;
Substitute a relevant .def file name into DEFSFILE parameter, you’ll need to use this later.
NOTE: In my example, I exclude some tables that I know I am not going to need in my replication. You may or may not want to do this. Be aware that you cannot generate definitions for externally organized tables (if you’re using them).
Generate the source table definitions using DEFGEN:
[oracle@shell]# cd
/u01/app/oracle/product/ogg_src
[oracle@shell]# ./defgen paramfile
dirprm/defgen.prm
This creates the .def file within ./dirdef/
The generated *.def file now needs to be transferred to the TARGET SERVER, and placed within $INSTALL_DIR/dirdef/
When we are configuring GG for first time we
need to set up initial load.
Configure Initial Data Load EXTRACT
These steps configure the initial load groups that will copy source data and apply it to the target tables.
<<< On the SOURCE SERVER >>>
Add the initial data load EXTRACT batch task group:
[oracle@shell]# cd
/u01/app/oracle/product/ogg_src
[oracle@shell]# ggsci
GGSCI>
ADD EXTRACT EINI9001, SOURCEISTABLE
NOTE: EINI9001 is created from the following format EINI<unique ID, max 4 digits>
Verify the EXTRACT created with the following:
GGSCI>
INFO EXTRACT *, TASKS
Configure the initial data load EXTRACT PARAM file:
GGSCI>
EDIT PARAMS EINI9001
--
--
GoldenGate Initial Data Capture
--
EXTRACT
EINI9001
USERID
<oracle schema user here>, PASSWORD <oracle schema password here>
RMTHOST
<IP of TARGET SERVER here>, MGRPORT 7819
RMTTASK
REPLICAT, GROUP RINI9001
TABLEEXCLUDE
SCHEMA1.CAP_*;
TABLEEXCLUDE
SCHEMA1.DR$*;
TABLE
SCHEMA1.*;
<<<
On the TARGET SERVER >>>
Add the initial data load REPLICAT batch task group:
Add the initial data load REPLICAT batch task group:
GGSCI>
ADD REPLICAT RINI9001, SPECIALRUN
GGSCI>
INFO RINI9001*, TASKS
GGSCI>
EDIT PARAMS RINI9001
--
--
GoldenGate Initial Data Load Delivery
--
REPLICAT
RINI9001
TARGETDB
oggrepldsn, USERID oggrepluser, PASSWORD <SQL user password here>
DISCARDFILE
./dirrpt/RINI9001.txt, PURGE
SOURCEDEFS
./dirdef/<definition-file-name-from-earlier>.def OVERRIDE
SOURCECHARSET
PASSTHRU
MAP
SCHMEA1.*, TARGET SCHEMA1.*;
<<< On the SOURCE SERVER >>>
Start the initial data load EXTRAC process:
GGSCI>
START EXTRACT EINI9001
View its progress with:
GGSCI>
VIEW REPORT EINI9001
NOTE: There may be many errors to resolve on your first EXTRACT RUN, table names not existing, data type mismatches, column names not existing, permissions, network level restrictions such as firewalls etc.
Assuming the EXTRACT runs, REPLICAT will start on the TARGET SERVER, verify this, and its results, with the following on the TARGET SERVER:
GGSCI>
VIEW REPORT RINI9001
You now have a DB in MSSQL with your Oracle data set in it, congrats! To aim for live change data replication from Oracle, we need to make use of a few more components of OGG.
The next section explains how to do this.
Configuring Real Time data extraction via
EXTRACT on source end
Through the use of trail files being shipped from SOURCE to TARGET, OGG can replicate changes in data detected at source (and written to the trail files). Here’s how to do that.
<<< On the SOURCE SERVER >>>
Add the EXTRACT group for CDC:
GGSCI>
ADD EXTRACT EORA9001, TRANLOG, BEGIN NOW, THREADS 1
NOTE: “THREADS” is an integer of how many EXTRACT threads are maintained to read the differe4nt redo logs on the different Oracle Instance Nodes. If you are not running an Oracle Cluster, or RAC, then set this to 1, setting a higher value does not improve single instance performance.
Verify it created OK with:
GGSCI>
INFO EXTRACT EORA9001
Configure the EXTRACT group for CDC:
GGSCI>
EDIT PARAM EORA9001
--
--
Change Capture parameter file to capture
--
EXTRACT
EORA9001
USERID
<sql-user-name>, PASSWORD <oracle-user-password>
RMTHOST
<target-server-IP-address>, MGRPORT 7890
RMTTRAIL
./dirdat/1p
TABLEEXCLUDE
SCHEMA1.CAP_*;
TABLEEXCLUDE
SCHEMA1.DR$*;
TABLE
SCHEMA1.*;
NOTE: The 2 character (max) identifier at the end of RMTTRAIL is important, make it unique, and remember it for later.
Create the GoldenGate Trail:
GGSCI>
ADD RMTTRAIL ./dirdat/1p EXTRACT EORA9001, MEGABYTES 5
Verify that it created OK:
GGSCI>
INFO RMTTRAIL *
And verify the results:
GGSCI>
INFO EXTRACT EORA9001, DETAIL
GGSCI>
VIEW REPORT EORA9001
Configuring Real Time Data replication via
REPLICAT on target end
The trail files defined earlier will be present on the TARGET server now, and they can be used by a OGG REPLICAT process to live replicate changed data from the TARGET.
On the TARGET SERVER
Edit Global PARAMs and create the checkpoint table:
edit param .\GLOBALS
MGRSERVNAME
MGR
CHECKPOINTTABLE dbo.chkpt
CHECKPOINTTABLE dbo.chkpt
Create REPLICAT checkpoint group:
GGSCI>
ADD REPLICAT RMSS9001, EXTTRAIL ./dirdat/1p, <Checkpointtable dbo.chkpt>
NOTE: The two letter prefix for EXTTRAIL is the same as earlier.
Configure
REPLICAT PARAM file for CDD:
GGSCI>
EDIT PARAM RMSS9001
REPLICAT
RMSS9001
TARGETDB
oggrepldsn, USERID oggrepluser, PASSWORD <sql-user-password>
HANDLECOLLISIONS
SOURCEDEFS
./dirdef/1pmoracle.def
DISCARDFILE
./dirrpt/RMSS9001.DSC, PURGE
MAP
SCHEMA1.*, TARGET SCHEMA1.*;
Start the REPLICAT process:
GGSCI>
START REPLICAT RMSS9001
Verify it is running with:
GGSCI>
INFO REPLICAT RMSS9001
Summary:
Providing everything is running without issue, you are now finished, This will continue to run all the time that you have the Extract and Replicat processes running. The initial data load EXTRACT and REPLICAT of EINI and RINI are redundant, unless you happen to ever want to drop your whole data set from MSSQL and have it replicated from scratch again.
Some of the above processes may seem simple, however documentation on a lot of it is few and far between, and when it can be found within Oracle Documentation, it is not often easy to interpret. In my testing, I was able to see change data appear in TARGET after altering it in SOURCE around 1second after committing in SOURCE.